A get-together in a country house with barbecue in the company of friends is a pleasant vacation that accompanies many weekends and holidays, starting from May and ending in late autumn. For an emotional company, a place may not be decisive - just build a brazier of several bricks. However, if you often spend time with your friends in this way, why not build a gazebo with barbecue facilities - a cozy and convenient corner where you can prepare treats and enjoy them.
Preparatory work
Before embarking on the construction of the brazier, it is necessary to clearly understand what you want to see in the end and what you need this structure for. If the main object for you is the arbor, and the brazier is a related element, the surroundings, then you most likely need to pay attention to the construction of this building.
Did you know? In Europe, meat fried on the grill, met in 1858. It was then that Alexander Dumas opened the first barbecue in Paris, having tasted a dish in the Caucasus.
In the same case, if a simple canopy also suits you as a gazebo, and the central figure is a barbecue, then you need to act accordingly: first, build the hearth, and then everything else. In any case, you need to start with the drawing. The next step is to determine what type of outbreak you need. After you decide which type of hearth to give preference, you should proceed to the design and drawing of the future structure.
It can be:
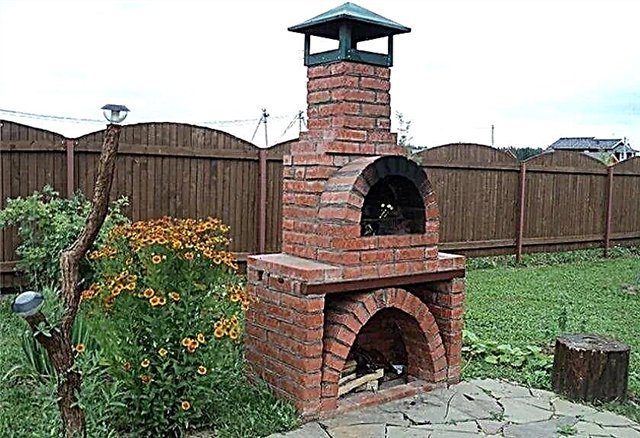
- traditional barbecue grill - the most common option. It is the simplest brazier with a niche for laying firewood and a chimney. As an option - a canopy. We can say that this building is in the style of functional minimalism - there is nothing superfluous, and at the same time there is everything necessary. Such a hearth is quite enough for frying kebabs, kebabs or steaks, at the same time it can simply create comfort;
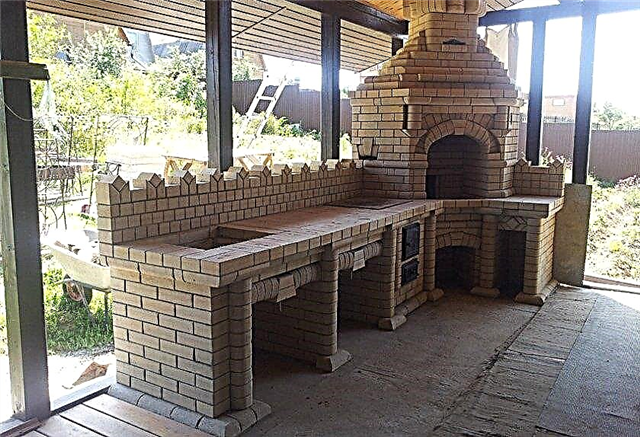
- furnace complex - the likeness of a Russian stove located in the gazebo. This is a real kitchen where you can cook first and second courses, grill barbecue or bake pies. Such a structure is intended, rather, for cooking than for a pleasant pastime. It is almost impossible to build such a furnace on your own for an inexperienced builder;
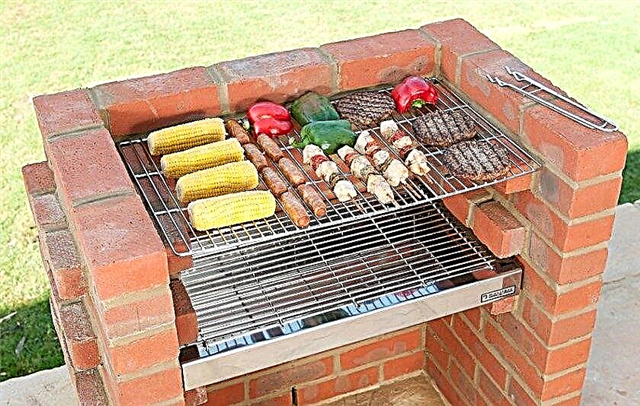
- barbecue - A simplified version of the barbecue in the American manner. It is a roasting pan with a removable grill, on which meat is fried.
Dimensional drawing
The planned project should be transferred to paper. A detailed drawing is necessary so that at any time you can check with the original plan.
Necessary materials and tools
For the construction of the brazier you will need the following tools and materials:
- brick (fireclay);
- sand;
- crushed stone;
- cement;
- metal pipes;
- fittings;
- timber, boards;
- Ondulin or corrugated board;
- trowel, spade, buckets;
- plumb line and level;
- hacksaw, hammer, chisels, drill, screws, grinder;
- metal corners and mounting plates.

Phased construction
The construction of the entire structure consists of the following stages:
- Foundation construction.
- The construction of the gazebo.
- Brazier construction.
The following are the general stages of construction and points to which special attention should be paid.
Site selection and foundation preparation
When choosing a place for construction, one should proceed from such considerations as remoteness from the house. If you plan to constantly take food in the gazebo, naturally, it is better to install it near the house. If it is intended solely for relaxation and gatherings with guests - it is better to choose a place remote and closed from prying eyes, for example, in the far corner of the garden.
In addition, it should be borne in mind that the gazebo itself is intended not only for feasts and meals, but also for relaxation. This means that the place needs to be selected accordingly - for example, in the shade of trees. In order for the entire structure, the gazebo and the barbecue, to stand confidently and firmly, you need to lay the foundation correctly. In principle, the entire structure has a fairly moderate mass, a foundation of any type is suitable for it: tape, reinforced tile or pile.
But under the brazier you need to build a separate base. So, perhaps, the best and cheapest and most practical is this option: a separate foundation under the hearth, and pile - under the gazebo. At the site selected for construction, it is necessary to clear the ground and level it. Next, you should mark the site for construction in this way: two rows of three pits under the pillars. In the third row, only two corner posts, instead of the central, third, a separate foundation under the hearth will be flooded.
Dig all 9 holes (8 under the pillars for the gazebo and a large under the fireplace) 40-50 cm deep. The pit under the barbecue should be 10-15 cm larger than its dimensions, in all directions. The holes for the posts for the gazebo are about 40 by 40 cm, the distance between them is chosen so that the extreme ones correspond to the corners, and the middle one is exactly between them. At the bottom of each, pour a layer of crushed stone (20 cm), sand on top. This pillow needs to be tamped, on it to lay the reinforced grid.
Did you know? About 3 thousand years ago, the Taino tribe migrated from the Yucatan Peninsula to Cuba, which was almost completely destroyed shortly after coming to the mainland of Columbus. In the language of these proud Aboriginal people, the barbecue was called the bar on which they tortured the captives.
To build a wooden formwork 10 cm above ground level. First make it for the grill, and then for the rest of the elements. Do not strive to make all the elements (formwork under the hearth and under the arbor) of the same height. In order for all parts of the foundation to be of the same height, proceed as follows: after the base of the brazier is ready, it is necessary to pull horizontal twines from it and pour mortar over them. The foundation itself can be made from concrete mortar of the M-250 brand.
It is prepared from such components (the parts are indicated in brackets):
- cement - 2;
- sand - 4;
- crushed stone - 7;
- water - 1.

After all the elements are flooded, it is necessary to give them time to harden. Depending on climatic conditions, this will take from several days to 1-2 weeks. Then, pieces of roofing material are laid on concrete, it acts as a waterproofing.On the frozen racks should make the lower harness arbor. Make it from a beam of 10 × 15 cm. From three sides from corner to corner, lay 3 timber, along the length of each side of the structure. On the fourth side, where the brazier will be located, lay two pieces of the same beam.
On the one hand, they will be laid on the corner supports of the foundation, connecting with the long bars of the harness (side). The other ends of the short fragments will be laid on the base of the grill (as already mentioned, its dimensions should be 15 cm larger than the projection of the focus). Along the contour of the same mangal base, the rest of the harness should be made from the timber, as if bypassing the future hearth along the contour.
Next, the phased procedure for the construction of the gazebo is as follows:
- The bars of the lower harness are connected to the floor of the tree. Between them to establish the logs - a kind of stiffening ribs and support for the future floor.
- At the corners of the harness and in the middle of the two sides, install vertical racks, two more racks must be erected at the two outer corners of the base of the barbecue, and vice versa - this will be the entrance aperture.
- All racks are attached with the help of corners and screws. After that, make the upper harness, similarly to the lower, only it will be of a quadrangular shape. At half height between the racks make struts from the same beam, fixed to the corners and screws.
- Then the roof is erected, it can be gable or four-gable, and they make the roof. The roof is best done below, on the ground, the simplest rafter structure. Sheathed with boards and corrugated board or ondulin. In the roof sheathing, leave a hole for the chimney. It is necessary to calculate the location so that it is located above the center of the barbecue.
- The finished structure is installed on the upper harness and fixed with fixing plates and self-tapping screws.
- As for facing the walls of the gazebo, here you can show your own creative abilities - sheathe them up to half the height with a vertical board
Rules for masonry bricks
When the foundation for the brazier is completely dry (1.5–2 weeks), you can proceed to the construction of the hearth. First you need to lay out the foundation, aligning the levels of the future fireplace and floor. This base, like the whole structure, it will be brick. In any case, the inner space of the hearth needs to be laid out of fireclay bricks; for the outer layer, you can take the usual red. In addition, you can use b / y material if you will build a hearth for the cladding.
Important! After hardening the solution, the circle should be removed very carefully.
The following is a step-by-step instruction for building the brazier and the basic rules for bricklaying:
- The first layer should be laid out from the corners to the center according to the markup. The following levels must be laid with a shift of 1/2 brick, first in one, and then in the other direction.
- After the bottom 3 rows have been kicked out, lay a layer of reinforced mesh to avoid fracture and cracking. The same is done in the future - after three rows of bricks - a reinforced mesh.
- After laying every two rows, check the structure for distortions using a bubble level and a plumb line.
- After the base is built, the firebox should be laid. The brazier can be made of brick or a pre-cast concrete mold.
- If you make an arched firebox, use a circle (a special arched shape, a piece of wood or metal). The space between the bricks is removed with the help of wood chips, after which it is filled with a solution and allowed to dry for 2-3 days.
- Above the firebox, you need to install a reinforced concrete beam or a reinforced corner, on which another row of bricks is laid.
- When laying out the brazier, you should leave small gaps between the bricks, do not close them with mortar. They contribute to better oxygen access and, consequently, combustion.
- Do not forget to lay small pieces of reinforcement between the rows of bricks - they will serve as a support under the barbecue grill. It is better to make several such supports located at different levels.
Video: brick grill buildings
Chimney installation
The chimney can be installed in several ways. On the finished brazier (brazier), make support columns from brick, to make a smoke collector from the same material, gradually narrowing it upward, with the output through the hole in the roof left for these purposes.
- This type of chimney has a beautiful appearance, although it suffers from significant shortcomings:
- you need to combine brickwork with a hole in the roof. If the pipe that you kicked out does not match the cutout intended for it, you will either have to increase the hole (thereby spoiling the roof), or break the dried masonry and rebuild, making adjustments (in this case, an asymmetric design may result);
- rather laborious construction process.

There is a much simpler option to equip the grill with a high-quality chimney. If you even made a slight mistake during the construction of the hearth, the hole for the chimney in any case will be in close proximity to the center of the projection of the barbecue. After the hearth is ready, install a separate pipe in the chimney, and attach a dome hood to the bottom directly above the barbecue, like a kitchen (metal 1 mm thick). In the corners, she will be supported by beautiful chains attached to the roof.
Even if the opening for the chimney does not coincide with the center of the barbecue, it’s okay - since the structure is independent of the hearth and keeps on separate chains, its tilt can be adjusted, and the pipe itself is not rigidly fixed. So a small roll will be almost invisible from the side. Above the pipe there should be a visor that protects against rain drops.
Finishing and canopy
If you equipped the chimney with a kind of hood, as described above, it will be simultaneously a canopy. Otherwise, you will need to make a visor by welding it from metal 1–1.5 mm thick. Thicker material will weigh too much. The classic canopy has the shape of a dome hood and is made of metal. If there are few options regarding the material used for manufacturing, then you can change the shape as you wish. For example, make a flat canopy. As for the decoration, here the best combination would be, perhaps, the classic forged parts: tongs, barbecue grills, chimney-type doors.
Regardless of which floors will be in the gazebo, the space in front of the barbecue is best made of tiles. But you can do it in another way: on a finished wooden floor lay a sheet of iron, the width corresponding to the barbecue, and 1 meter backward from the front edge of the structure. If you built a hearth from a beautiful new brick, then something is unnecessary to cover it. Otherwise, you can make a tiled cladding. Do not forget to equip hooks for grids and skewers near the hearth.
Literally following the above project is not necessary. You just need to take it as a basis on which you can realize your own ideas. The main thing is to remember, before starting construction, make a detailed drawing, in the future it can help avoid mistakes.


